THE JOURNEY HAS STARTED ( May 20 2016)

The 11th of June 2016, after more than a year sailing the lake of Locarno, TI WAY is going to begin a complete restyling. In order to be prepared to face the Mediterranean Sea at first, and then the Atlantic Sea.
The Lake of Locarno was a superb training “court”, but it is time to move on and get serious!!
The boat cart is done (June 1 2016)
To allowed me to work on the boat and to move it around in my garage, I had to build a boat cart with caster wheels. Since steel is expensive around here a opted for wood.
Maybe at the end it was not the best choice. But It should work anyway.


TI WAY is out (June 11 2016)
After almost 12 hours of hard work, TI WAY is finally out of the water on the cart in the garage. It was all possible thanks to the amazing help of my friend Luke and my girlfriend.
Pretty much everything went as planned. We just had to struggle a little bit getting of the boat with the cart from the trailer.
In a few week I will start working on it..


Sanding (September 9 2016)
Sanding has started, fortunately an awesome Festool sander make the job much easier and cleaner. Freeboard of the hull is almost compleated, got left the draft hull and the inside. Started dismounting the electrical system, it is going to be rerouted with new wires and upgraded navigation systems.


After finishing the sanding process, I will start with the reinforcement of the week hull parts.
Structural carbon reinforcements tests (October 9 2016)
Due to the age and wear out of the boat, some parts need to be reinforced.
Carbon is the way to go…at least it is what I have heard. I have made some prototypes to find the best way to do them.
Here is a little bit how I have organized the composite “laboratory”. Mirror are used to have a super fine surface of the carbon laminates. I am thinking to live it as it is at the end on the boat.


First laminate, 3 layers of carbon twill 2/2 600gm/m2. Final thickness should be around 2mm.


Laminate came out perfectly, overall thickness 1.9mm +/-o.05.
I did some experiments on sandwich laminates, this is going to allow weight reduction and much more stiffness. Used 3 layers of carbon twill 2/2 160 gm/2 per face and 20mm foam, final thickness carbon laminate 0.6mm.


Even with such a thin laminate, stiffness is incredible high. Anyway I will increase thickness of laminates, probably insert a layer of unidirectional carbon longitudinally.
Milling carbon laminate (October 10 2016)
Checking out how the milling of the laminate comes out.
It is a long time that I do not use CNC milling machines, I have forgotten most of the basic rules of G codes ;-). Fortunately “The BIZZ” (a friend) is helping me out, a lot.
Bought some special milling tools for carbon laminates and sandwich laminates.


The round plate is going to reinforce the winch area and distribute pressure over a bigger area. On the inside I am going to use a sandwich laminate, to increase even more stiffness of the stressed area.
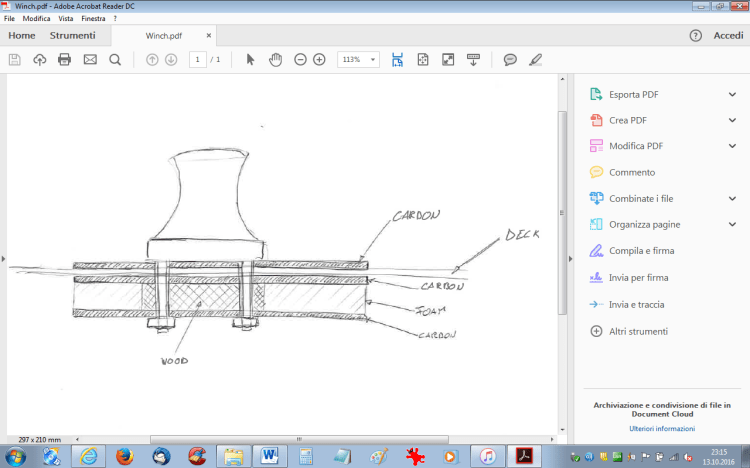
Carbon sandwich laminate (October 16 2016)
For the inner reinforcement of the winch, as explain above, I have opted for a sandwich laminate with wood inserts to avoid compression of the foam.


The first sandwich prototype was laminated one side at a time.


The result is incredible. I think that is going to be the last part that will break. Deck will collapse much sooner than the sandwich. I would love to make a load test to the braking point, to get some numbers of the piece.
Sandwich milling (October 18 2016)
Took about 1 hour and 30 minutes to get the job done. The cut is quiet clean even if a lot of dust had contaminated the foam. No big deal, but it do not look super nice 😉 I should probably make a fine run at the end to eliminate the problem.


Deck reinforcement sandwich (October 25 2016)
The sandwich that I have prepared is made of two layers of unidirectional carbon, a layer of twill carbon per side and 20 mm of foam. Finished part will than be glued to the inside of the week deck areas.
Really proud of the result. The piece is long 60cm and wide 10cm for a total weight of only 270 gm. Will hold almost 70 kg without breaking. That is pretty impressive.


First view of reinforcements results (November 5 2016 )
After a lot of work preparing composite parts. Now it is time to set them in place inside the boat. Hopefully they will do the job for what they were “engineered”.
I tough that would not take that much time to glue them to the boat. I was wrong. Again a lot work.
Here are couple picture of the work. I started with strengthen deck and winch area.


Color decision (November 6 2016)
One of the toughest decision. Color of the boat. I kind of already chose the livery, I am only not sure about the magenta color.


Bow rebuilding ( January 22 2017)
One of the hardest job that I had to deal with untill now. Due to water filtration trough the pulpit fixing points, the plywood started to rotting. Losing most of the mechanical properties.
Since the 3 meter long bowsprit is directly connected to the pulpit, it is under high loads during some maneuvers.
Obviously I have decided to go with carbon sandwich reinforcement 😉 Sandwich is made up of mixed layers of twill and unidirectional carbon fiber, for a total of max 10 layers depending on the area. Predicted high load area have more layers of carbon fiber.


Mainsail traveller ( January 22 2017)
Did not quiet like the previous solution. Not enough precise when trimming the mainsail.
Decided to go with an Harken traveller system…Off course another carbon fiber part must be produced to support the tracks.
Already cut out the foam…I am afraid is going to be oversized compare to the actual load that the mainsail can generate. I am guessing that the final weight of the support is going to be around 3 kg…accectable.


Mainsail traveller carbo support (March 3 2017)
Had to put in some thinking to define the laminating procedure. To consolidate the rail with the carbon support, wood inserts are going to be placed in the foam. Unidirectionl carbon fiber will take over the load of the wood inserts and hopefully transfer it to the full laminate.


Extra reinforcements parts (March 11 2017)
Other reinforcements carbon parts for back stay rig and main and second water pump. Want to make sure that nothing will collapse under load. Parts should also make the cockpit deck more stiffer.


Deck “last” step ( March 12 2017)
Carbon gunwale, since I am really tired to do maintenance on the gunwale every year I decide to try to do them in carbon fiber…maybe it will increase the resistance to wear out


Since i have left some fiberglass, i have tought to use it to reinforce the deck. After more than 8 hr of hard work sanding the anti slip coat made of quartz sand, I can finally start with the fiber glass. I did not sand it down to the wood as I wanted but at least now the surface it is clean and rugosity good for laminating. Laying fiberglass over paint is not the best solution, shear stress ant traction load should be relatively low on deck, I think it is not going to be a problem.


Hatches replacement (March 25 2017)
Existing hatches suffered of water infiltration and was weak build. Therefore I have decided to replaced with something newer and more resistant. Unfortunately I did not find the same hatches size, the opening had to be modified to fit the new hatches.


New chart plotter (March 26 2017)
Not much to say about it, probably the easiest job….


Painting (May 31 2017)
Did not really have time to keep the web site updated. Painting kept me pretty busy in the last few weeks. Preparing the surface, sanding the hull took a lot of time and hard work. But finally I am almost finish.
Here are some picture of the work starting from protective coat


For the base coat since I used a spray gun it was necessary to build a painting room to avoid that the overspray would go on the surroundings objects mines and of the neighbours…to blow up the plastic film I used a 9kW electric heater with fan, I also attached another fan to evacuate the overspray with a filter to trap the color dust.


Sprayed 3 hands of base coat and two hands of clear coat:


Clear coat:

The color change so much depending on the intensity of the light. It looks good, can wait to see it under the effect of sun light.
Deck is done, time to work on the hull. Sanding the antifouling and primers took me almost 3 days…The hull it is in really good shape, but I wanted anyway to used a protection against osmosis…so went with Aquastop by Veneziani seem like a really good product… it allowed you to put about 0.2 mm per hand…


As done for the deck also for the hull I had to build a painting room…a little bit more complicated.


There is not much space as I would like to have, but it should work…let see 😉
There she is after almost 12 hours of painting…it is not perfect but looks cool. Only problem that I should have sanded deeper the primer and protective coat..to achive a more shining result.


Deck antiskid (June 3 2017)
Race boats must have good grip on their deck…what is better than quartz sand??


First hand


Final result


Instruments (June 4 2017)

Keel (June 5 2017)
I tought that the keel needed a little sending and a couple of hands of antifouling…couple hours job!! I was wrong…keel is dripping water..not good…


Rust on a structural part is never good…fortunatelly it has not penetrated too deeply in the steel. Need to get rid of all that rust and protect the surface with some good primer..


Now is time to rebuild the shape of the keel…


Some fiber…


Some extra coating protection and antifouling


DONE!!
Final details and transporting support (June 10 2017)
Applying the stickers.


Since I “had” some spare time I have decided to build a special support for the transport…so that I don’t need special permissions to drive on the roads…boat is 3 m wide max wid allowed on european roads 2,55 m…that means that the boat must be at an angle of 35° to fit..


Repairing the transom (December 30 2017)
Since my insurances is giving me some support, a boat builder will make the repair for me. I am still going to provide the main parts (rudders supports). At least I wil know what is under😉


Main sail traveler ( March 24 2018)
After fixing the boat from the storm damages , it is time to move on and complete the boat. After several design changes I finally decided where to mount the traveler. It came out stiff as a steel beam!!! Love it. It is a mix of foam, wood, carbon, Kevlar.


Carbon plate for the clutches (April 21 2018)


New rudder system (May 5 2018)
Finally I have found a clever solution to avoid that the connecting bar off the rudders is in the way of the engine. In this way I don’t have anymore to dismount the engine to operate the rudders. It is only 17 kg…but still… 😉
It is still in a rudimental state, I will soon replace the alu and wood parts by carbon.


Rudder sysrem carbon conversion (May 10 2018)
After a few test, I have approved the system and decided to upgraded to carbon. I have only made the two main arms. I will later replace also the stainless steel rod to a carbon one.


Carbon fuse box (June 6 2018)
I need a box for the fuse holder. Buy a standard one?? Not so cool…Bought a Tupperware box to be used as a mold and laminated with carbon.


Carbon Solar panels (January 3 2019)
Two 35 Watts solar panel, need a proper support. The support is planned to be fixed to the main traveler beam. 70 Watts to keep the beers as cold as possible 😉


New backstay control system (June 1 2019)
With the current system I was no really able to put enough tension in the for stay and to do some fine tuning…so I changed a little the layout of the control system


System works really well. Can put so much tension in the system that I am a little afraid that the mast will snap…heheheh
Autopilot tiller (June 2 2019)
Finally took some time to install the autopilot…seem to work fine, in the next few weeks I will make some tests sail..

Beer holder (June 3 2019)
One of the most important future is now installed…This Ronstan beer holders are really cool, very fast to be installed and the also have some insulation to keep the beer cold 😉

New carbon tiller (January 13 2021)
I have finally find some spare time to start upgrading my Mini tiller. The current one has some issue when steering, often in gets trapped in to the backstay lines. I also increased the length, and raised the attaching point of the telescopic tiller.


